| What |
Image / Example
|
| Basic
layout |
|
|
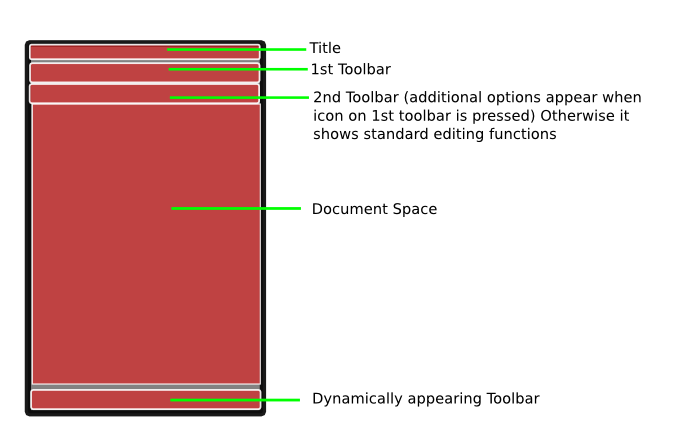
Layout consists of the shown regions on the screen
|
Basic
layout -
expanded settings
|
|
|
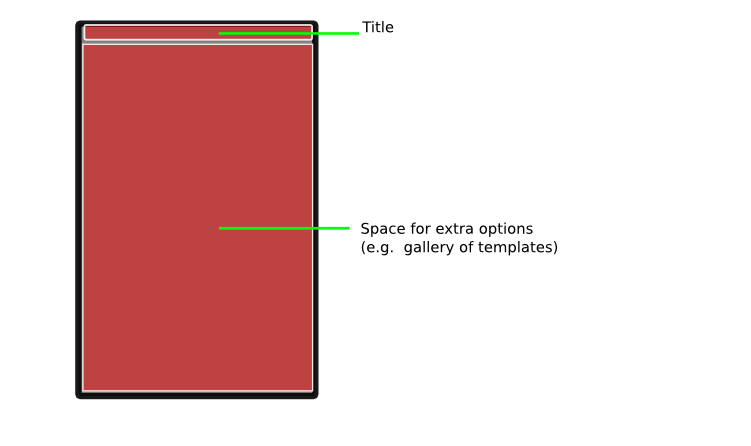
This expanded layout appears when special options are chosen which consume a lot of space
|
Toolbar
layout
|
|
|
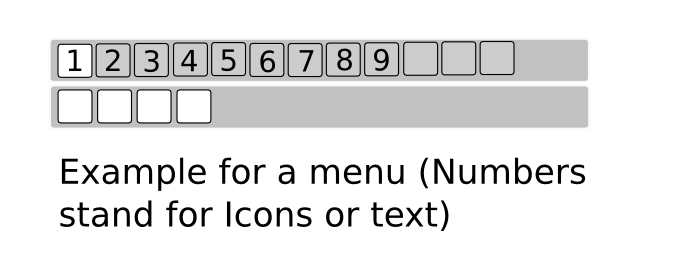
In
the standard view there should always be two toolbars visible. The
numbers on the buttons stand for icons which yet have to be added.
If an icon in the 1st toolbar is clicked, the second toolbar with sub-fuctions will appear on top of the standard-text-editing toolbar. As long as no Icon of the 1st toolbar is clicked the standard-text-editing-toolbar shows.
|
Menus and functions
|

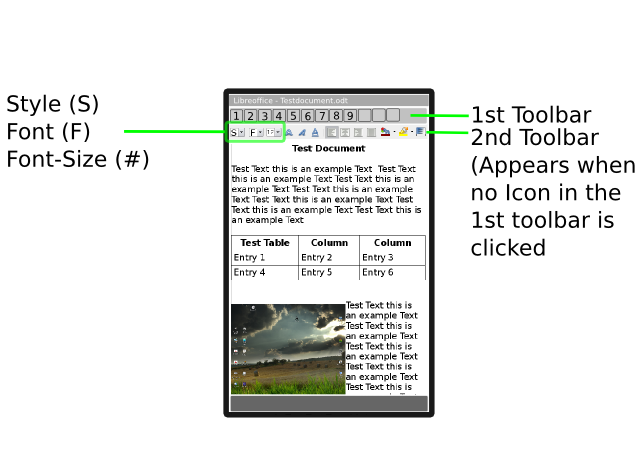
This is supposed to be the standard view of the toolbars (here with
text on top of the buttons within the 1st toolbar instead of icons)

If for example 'File' is clicked the 2nd toolbar for file appears on top of the standard-text-editing toolbar.

The 'insert' toolbar

The 'Tools' toolbar

The 'Layout' toolbar

The 'Object' toolbar
|
|
These
are supposed to be most functions necessary for a mobile version of
Libreoffice. But there is still enough space for more icons/functions.
|
Font type and styles
|
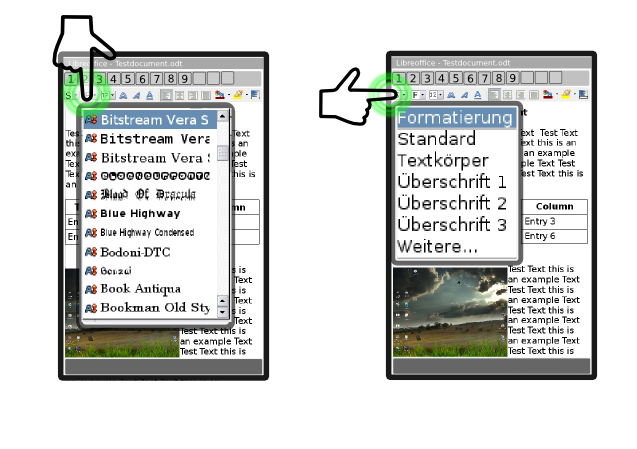 |
|
When clicking on some icons such as the font-type or the text-styles a drop down menu expands with a list of fonts or styles. |
Impress layout
|
|
|
The
impress layout is supposed to be in landscape format. the slide
overview is shown on the very left, the current slide on the right and
the menu bars 1 and 2 in between them. The standard-text-editing toolbar
is supposed to always show on the top. When no icon of the 1st toolbar
(vertical, left) is clicked, the 2nd toolbar disappears and the space
for the slide scales up.
|
Calc layout
|
 
|
|
The
calc layout is supposed to be flexible between landscape and portrait
format. In the landscape-view the toolbars are arranged the same way as
in the impress-mode except that on the bottom the standard toolbars are
the formula and the table-toolbar (as well as the switch button to
change the bottom toolbar*)
|
Move, zoom and move document
|
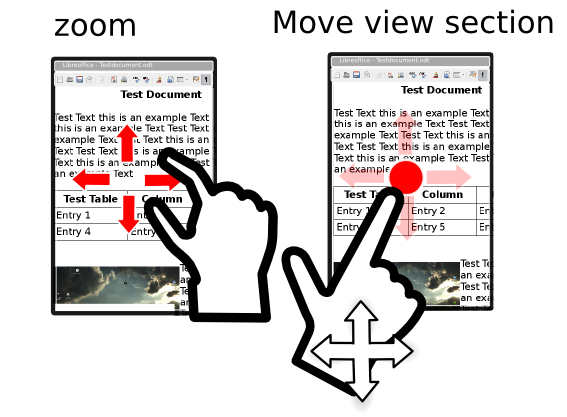
|
|
In order to zoom, move or scroll within a document simply tap the screen with the finger as shown here
|
Text search
| 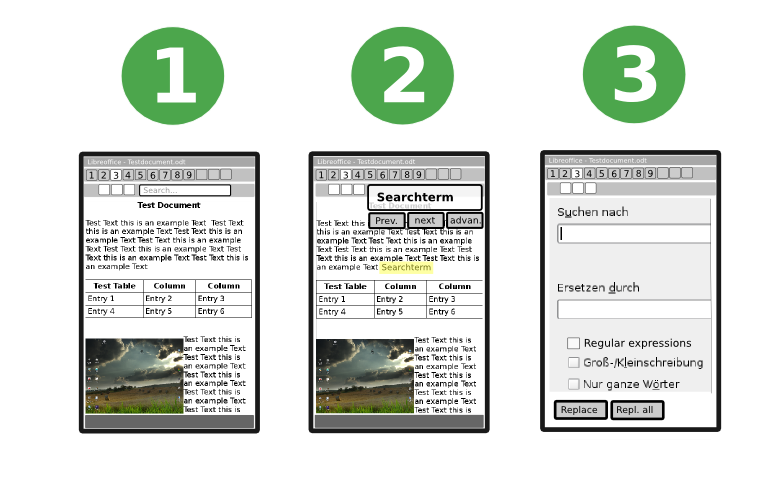
|
| If
clicked on the 'tools' icon in the 1st toolbar the second toolbar
appears and already contains a small search field (1). When tapped on
this search-field it expands (2) and the search words that are typed in
are marked yellow in the text. The advanced search (3) has the basic
functions of the desktop version of libreoffice - especially
search&replace, case-sensitive search and regular expressions.
|
| Save document | 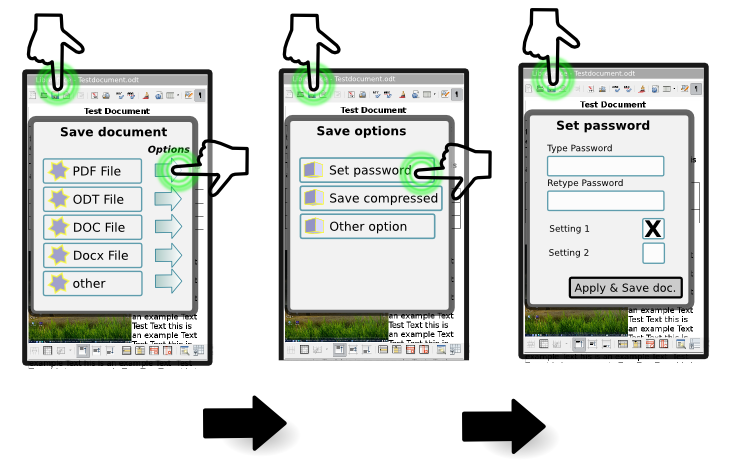
|
| The
save-document dialog should only contain very few of the most common
formats. There is supposed to be an options-arrow for additional
options - especially for document passwords and for additional PDF-export options (such as resolution, compression of images etc).
|
| Print and export preview |
|
|
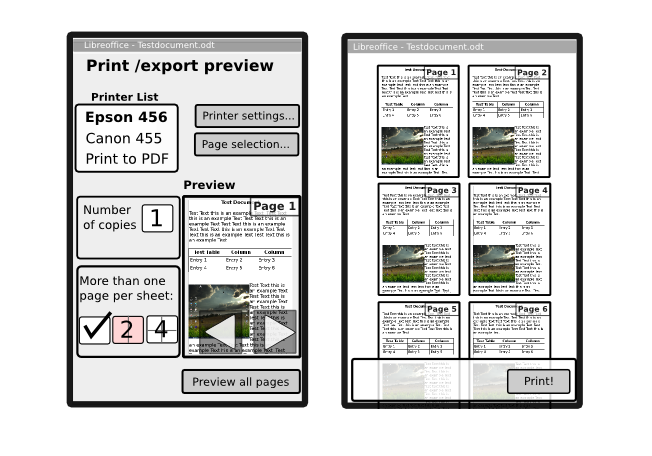
The
print preview / export pdf screen consists of a printer / PDF
list, two buttons for additional options, a field for the number of
copies and one for multiple pages printing as well as a print-preview
window. When clicked on 'Preview all pages' a new window appears filled
with preview pages only. These preview images can be scrolled down with
the finger.
|
Image Effects - basics & layout
|
|
|
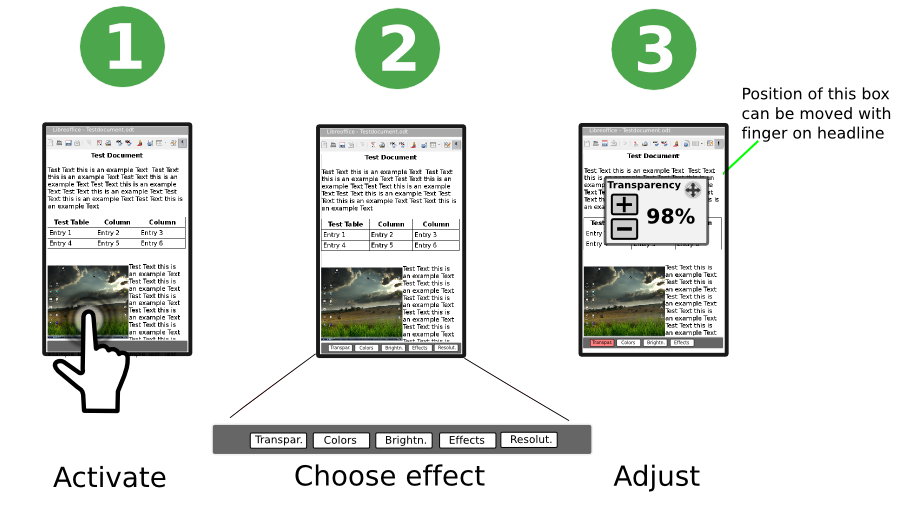
Image
effects can be activated by tapping on the image long. Then an effect
toolbar on the bottom appears. When clicked on one of the icons there,
a small window in the middle of the screen appears. The effect is
applied in real time. When tapping outside the small effect window on top
it disappears and the changes stay (no okay clicking necessary). |
Image Effects - advanced dialog
|
|
|
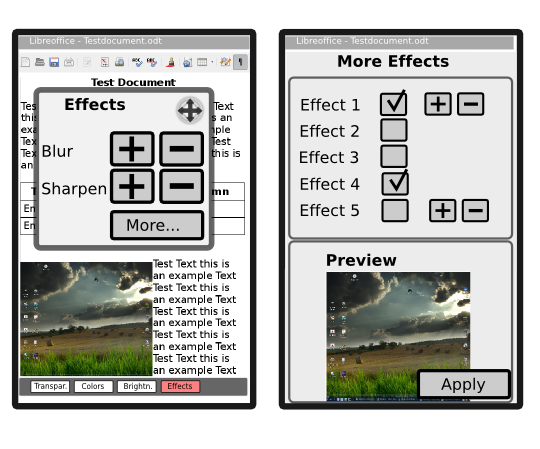
If
the Effects button in the bottom toolbar is clicked, a little effects
window appears. The preview here works in real time, so the image
in the document changes if for example blur + or blur - is tapped. If
tapped on 'more', more effects appear.
|
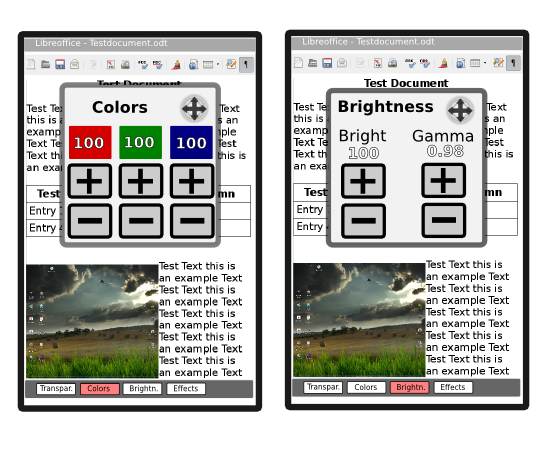
Image Effects: Colors and brightness
|
|
|
...More effects: Colors and Brightness... |
Document
Templates
|
|
|
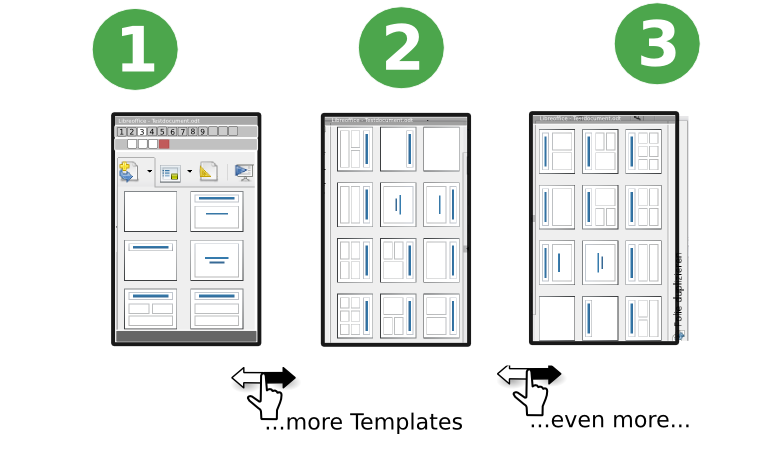
Choose
templates by clicking on Layout - Template and the templates drop
down. To browse additional templates tap on the screen, hold and move to the left so from the right additional templates appear. |
Working with images
|
|
|
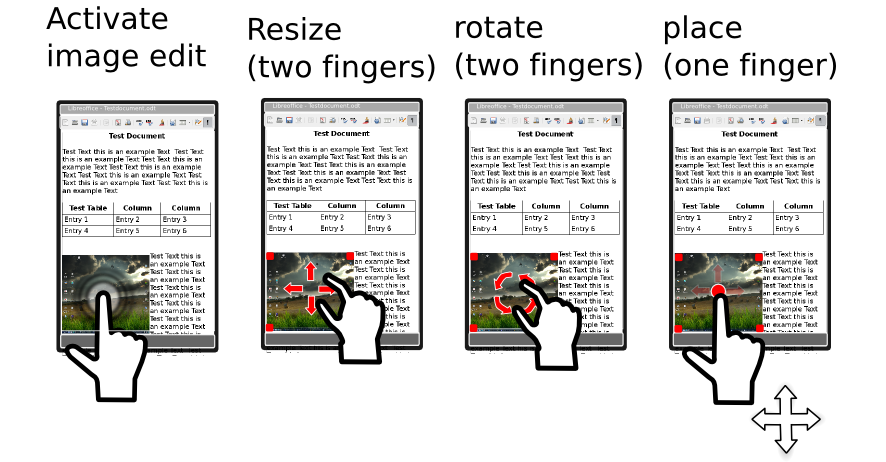
Working
with images can be activated by tapping on the image long. Then red
editing squares appear on the corners of the image appear. With two
fingers/multitouch then the images can be resized, rotated or placed
within the text. |
Advanced table options
|
|
|
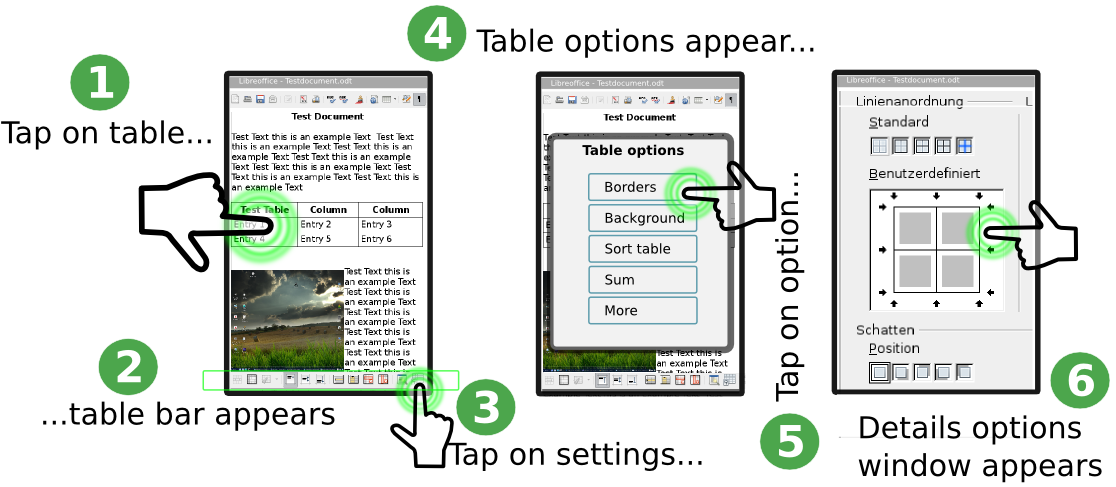
The table toolbar on the bottom doesn't cover all functions. So it might make sense to implement a 'table options' icon in that toolbar for additional options.
|
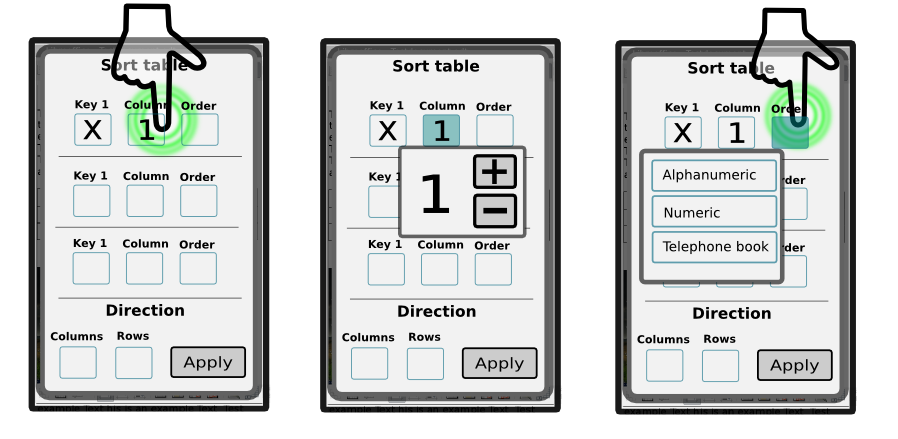
Sort table
|
|
|
When the icon for 'sort table' is tapped the menus shown here appear in full screen |
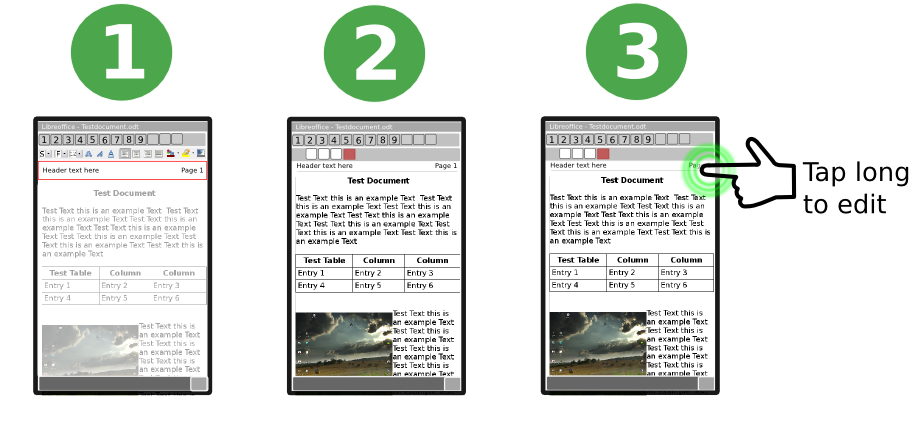
Header and footer
|
|
| Header and footer editing can be activated
by clicking on the 'Layout'-Icon in the 1st toolbar. In the 2nd toolbar
'header' or 'footer' can be than tapped on. As shown in (1) then a red
border around the header or footer appears and the rest of the page
faded out a little. In order to edit the footer or header one has
to tap on it and the edit mode wil reappear.
|